I still remember how, toward the end of 2025, OpenClaw suddenly showed up everywhere. It didn’t just feel like another AI tool, it felt like a leap. Instead of waiting for step-by-step instructions, it could actually take control of a computer and complete tasks on its own. That shift alone made a lot of people, including me, stop and pay attention.
So what exactly makes OpenClaw different? Why can it operate so independently compared to traditional AI tools? And more importantly, is it something a beginner can realistically pick up and use without feeling overwhelmed?
In this post, I’m going to walk through everything you need to know about OpenClaw, from how it works to how you can start using it right away.
I. Getting to Know OpenClaw
OpenClaw is an AI tool that only launched in November 2025, but it quickly became one of the hottest topics in the tech world. It was developed by Austrian engineer Peter Steinberger and built on an open-source community foundation, with the goal of creating AI assistants capable of operating autonomously across a computer.
What makes OpenClaw stand out is how differently it approaches tasks compared to most AI tools today. Instead of responding to individual prompts step by step, we can simply provide a high-level goal. From there, OpenClaw breaks the objective down into smaller tasks and assigns them to different AI agents, handling things like analysis, planning, executing commands, and more, until the job is completed.
II. Key Features of OpenClaw
It’s easy to see why OpenClaw has been gaining so much attention and quickly becoming one of the standout AI tools of 2026. What really gives it a competitive edge? Let’s walk through the features that make it so powerful.
1. Direct Computer Control and Local Operation
One of the biggest advantages of OpenClaw is that it’s an open-source AI agent that runs directly on your computer. That means your data doesn’t have to be sent to the cloud, unless you choose to connect to third-party APIs like Claude or ChatGPT. As a result, your information stays private and isn’t tracked by external companies.
What I find especially interesting is how it adapts to personal habits over time. OpenClaw can learn your preferences and daily routines, allowing us to create custom rules instead of being limited to fixed features like traditional software. For example, it can prioritize emails from your boss, remind you to drink water every two hours, and consistently follow those rules without needing repeated instructions.
2. Autonomous Task Execution
This is where OpenClaw truly stands out. Instead of requiring step-by-step guidance, it can break down tasks and execute them on its own.
Once given a goal, the system uses computer vision to “see” what’s happening on your screen, analyze interface elements, and perform actions just like a human would. It can handle Excel tasks, read and categorize emails, draft and reply to messages in a professional tone, and even detect scheduling details in conversations to automatically add them to your calendar.
Beyond that, OpenClaw can fill out booking forms, organize files using system commands, and carry out tasks through messaging platforms like Telegram, WhatsApp, or Slack. In many ways, it feels less like a tool and more like a digital assistant actually working alongside you.
3. Integration with Multiple AI Models
Another strength is flexibility. OpenClaw isn’t tied to a single AI model. Instead, it allows us to connect API keys from leading AI platforms like Gemini, DeepSeek, ChatGPT, Claude, or Grok.
This means we can choose the most suitable model for each specific task, whether we want faster responses, better reasoning, or higher-quality outputs, while still keeping our local environment secure.
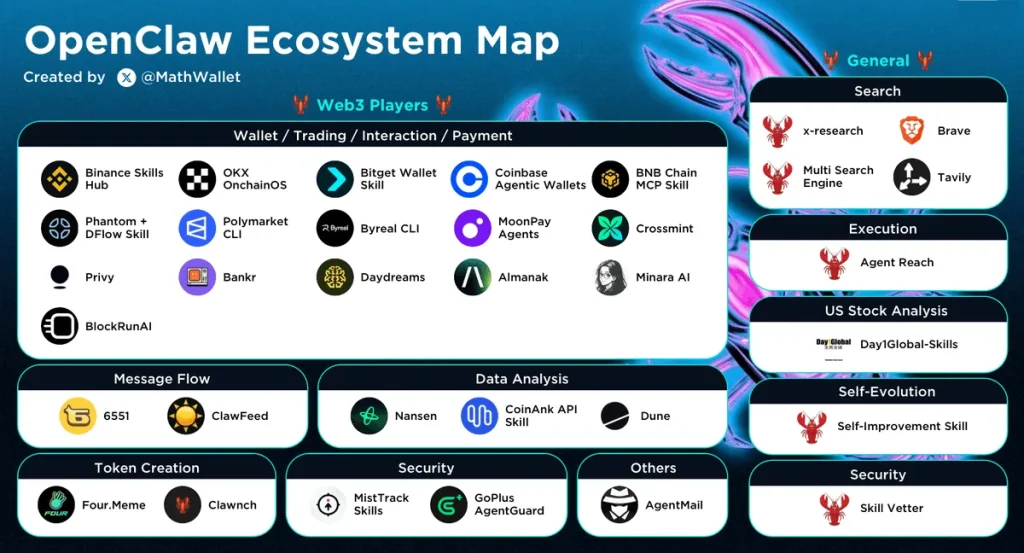
4. A Rich Skill Ecosystem
Finally, OpenClaw comes with a surprisingly rich ecosystem of skills. There are hundreds of pre-built “AgentSkills” shared by the community, covering everything from automated reporting and image editing to news tracking, online shopping management, and study support.
What makes it even more powerful is the ability to extend it further. We can ask OpenClaw to create new features using simple commands, effectively customizing it to fit our exact needs. And since everything is built on an open-source foundation, these capabilities are accessible to anyone who wants to experiment and build their own workflows.
III. How to Install and Set Up OpenClaw
Before getting started, let’s make sure your machine can handle OpenClaw. Since it runs locally and can automate complex workflows, the hardware requirements are a bit higher than typical apps.
System Requirements:
- CPU: AMD Ryzen 5 or a recent Intel Core i5 (or higher)
- RAM: At least 16GB
- Storage: Minimum 50GB of free SSD space
Step-by-Step Installation Guide
Step 1:
Download and install Docker Desktop from the official site: https://docs.docker.com/desktop/setup/install/windows-install/
Step 2:
Install Node.js from: https://nodejs.org/en/download
Step 3:
Go to the official OpenClaw website: https://openclaw.ai/
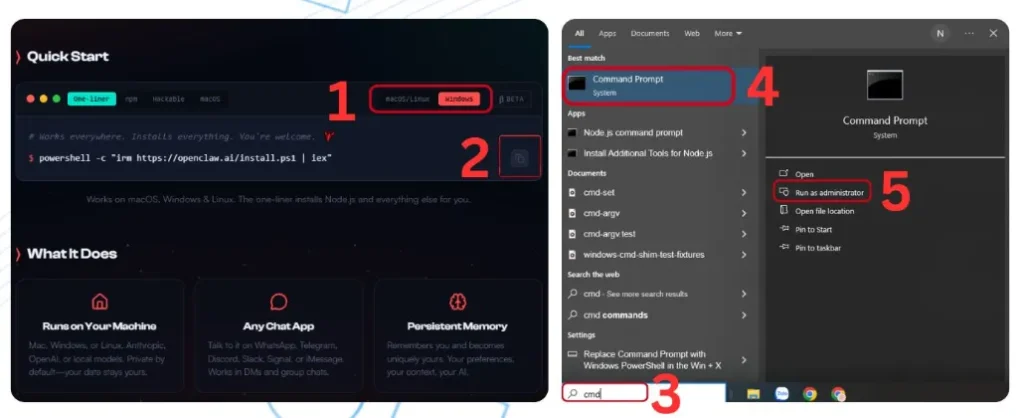
Scroll down to the Quick Start section, choose your operating system (Windows, macOS, or Linux), and copy the provided command.
Step 4: Run the Installation Command
- On Windows: Search for “cmd” → right-click → select Run as administrator → paste the command into Command Prompt
- On macOS: Press Command + Space → type “Terminal” → press Enter → paste the command
Step 5:
Wait for the installation to complete, then type:openclaw onboard
This will open the setup interface.
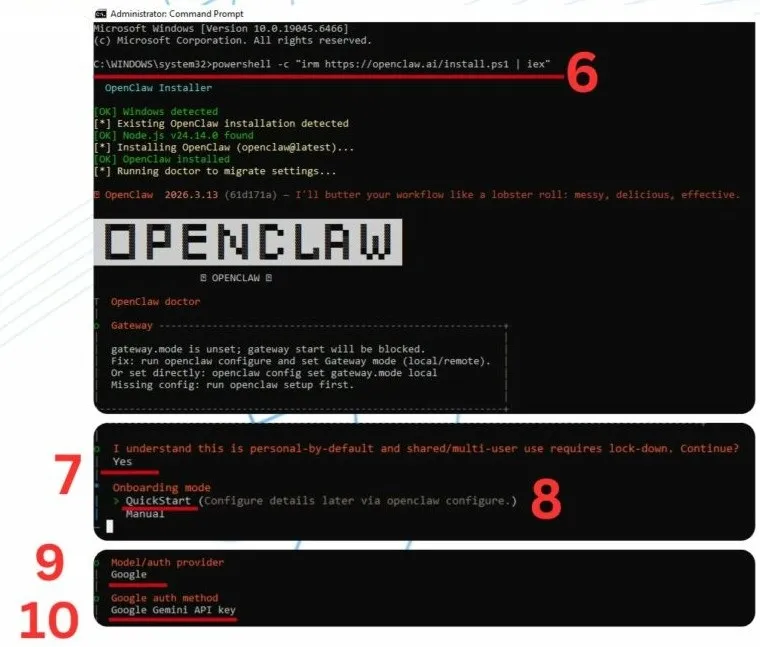
Step 6:
When prompted with: “I understand this is personal-by-default and shared/multi-user use requires lock-down. Continue?”. Type Yes.
Step 7:
Use the arrow keys to select QuickStart, then press Enter.
Step 8: Choose an AI Model Provider
At Model/Auth Provider, select Google if you want a free option without needing a paid plan. Then choose Google Gemini API Key as the authentication method.
Note: Other AI models typically require paid accounts, and using multiple models may increase costs.
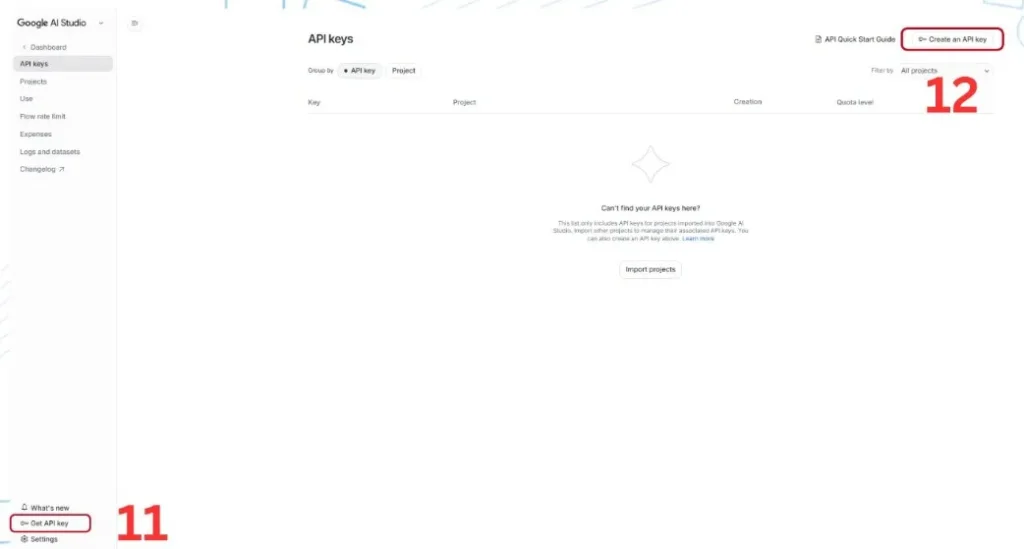
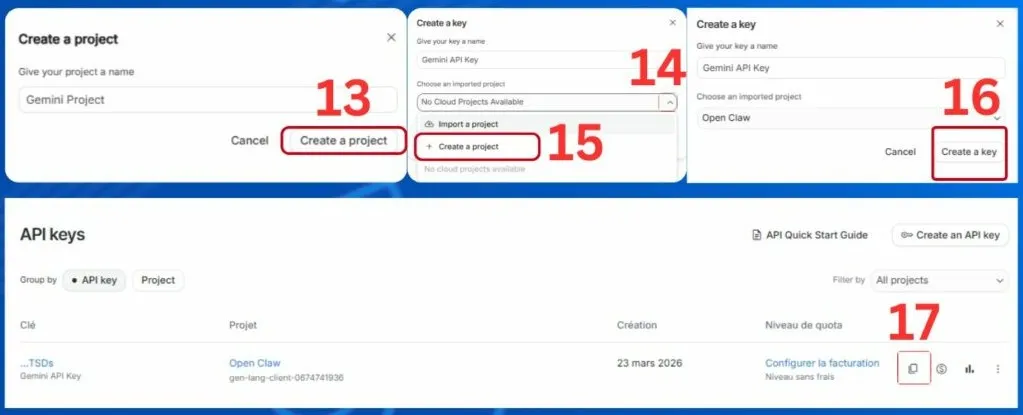
Step 9–10: Get Your API Key
Go to Google AI Studio, sign in, and generate an API key:
- Click Get API Key → Create an API key
- Create a new project → generate the key → copy it
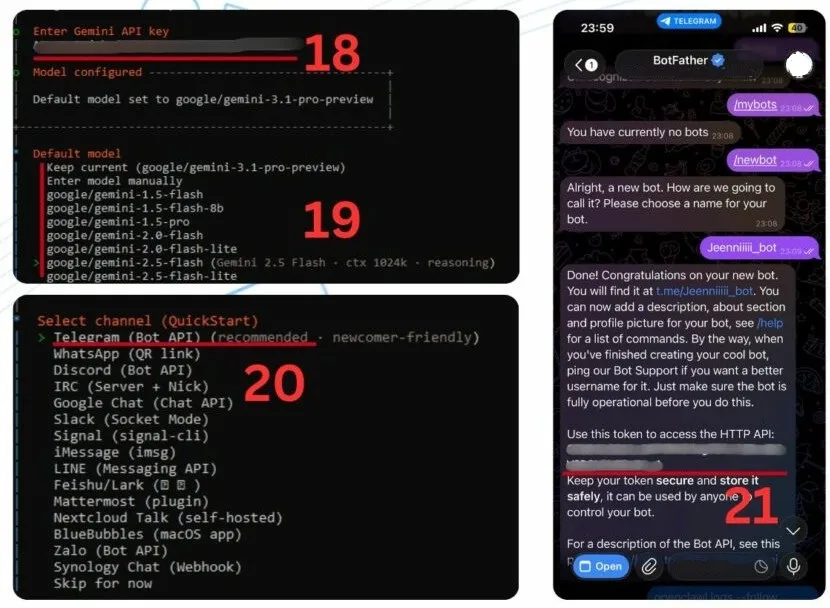
Step 11:
Paste the API key into Command Prompt or Terminal.
Then choose a Gemini model (if you’re using the free tier, pick any “Flash” version).
Step 12: Connect a Messaging Platform (Optional but Powerful)
If you want to control OpenClaw via messaging apps like Telegram:
- Open Telegram → search for BotFather
- Type
/newbot→ set a name and username (format:username_bot) - Copy the generated token and paste it into your terminal
Then:
- Search for userinfobot
- Copy your user ID and paste it into the terminal
Step 13:
For Search Provider, select Gemini (Google Search) and enter your API key again.
Step 14:
When asked to configure skills:
- Select Yes for setup
- Choose Skip for now when prompted to install dependencies
- Enter No for additional API setups
- Skip enabling hooks for now
Step 15:
When prompted:
- Select Restart for the gateway service
- Choose Open the Web UI

Once completed, OpenClaw will automatically launch in a new browser tab, and you’re ready to start exploring.
At this point, I’d say the setup might look a bit technical at first, especially for beginners. But if we follow each step carefully, it’s totally manageable, and once everything is up and running, the experience feels incredibly rewarding.
IV. A detailed guide to using OpenClaw
From my experience, getting started with OpenClaw is actually quite straightforward. There are two main ways I usually use it, depending on what feels more convenient at the time.
Method 1: Using OpenClaw on your local web interface
This is the simplest way to begin.
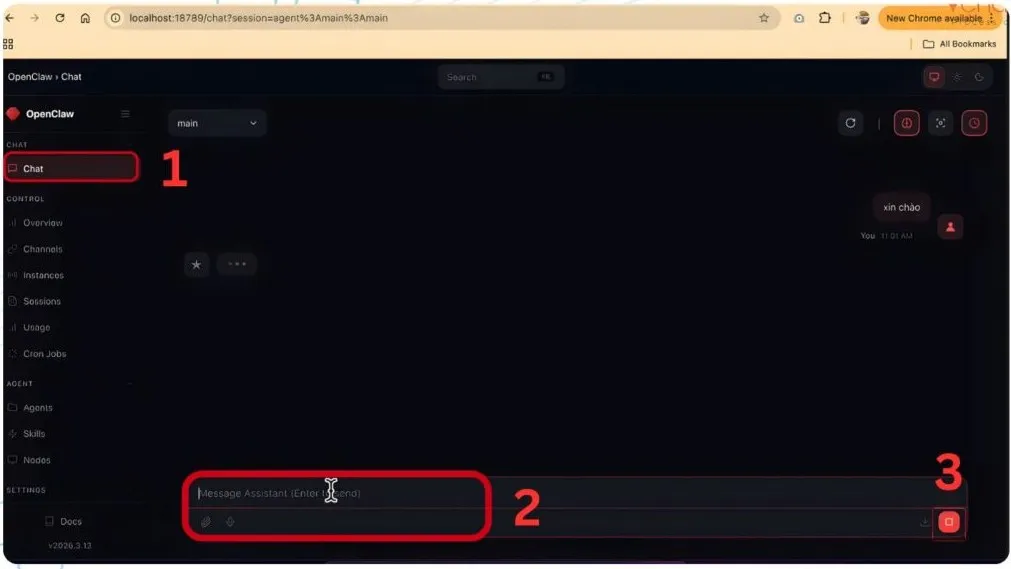
Once everything is set up, I just open the local OpenClaw web page. There’s an input box right on the screen, think of it like chatting with any other AI tool.
I type in a prompt (anything I want to ask or request), hit enter, and OpenClaw responds almost instantly. The experience feels very similar to using tools like ChatGPT or other AI assistants, so there’s no real learning curve here.
If you just want something quick and direct, this is the method I’d recommend.
Method 2: Using OpenClaw through a messaging app
Sometimes, I prefer interacting with OpenClaw right inside a chat app, it feels more natural, especially if I’m already using it daily.
Here’s how I set it up:
Step 1:
Open the messaging app that I’ve connected to OpenClaw. In my case, I went with Telegram.
Then, I search for BotFather.
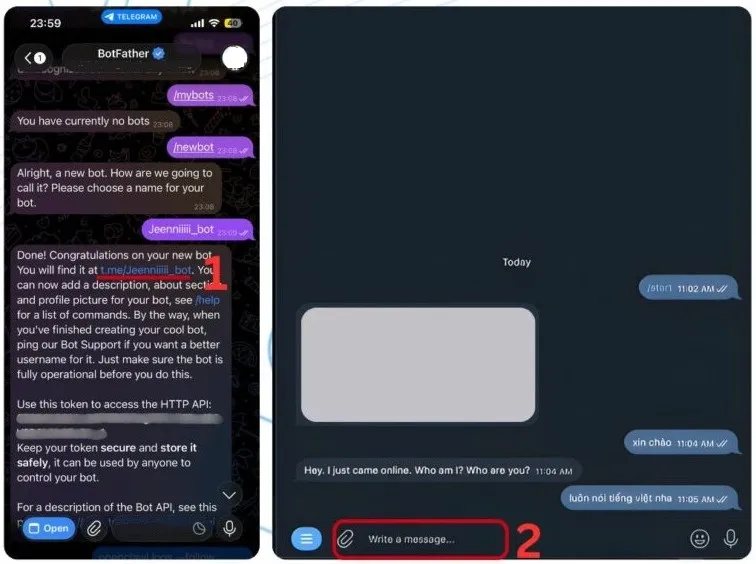
Step 2:
After completing the setup, Telegram sends me a bot link (usually in the format t.me/your_bot_username). I just click that link to open the chat with my bot.
From there, it works just like the web version, I type in a prompt, send it, and OpenClaw replies based on my request.
Personally, I switch between these two methods depending on the situation. If I’m working on my computer, the local web interface is perfect. But when I’m on the go, using Telegram makes everything much more flexible.
V. Common prompts I often use with OpenClaw
After spending some time experimenting, I’ve found that the quality of results really depends on how clearly I write my prompts. Below are a few formats that I personally find useful across different scenarios.
1. Research prompt
When I need deep, multi-angle insights, I usually structure my prompt like this:
Imagine you are a team of 4 specialized researchers with the following roles:
• Researcher 1: Search and summarize the latest information from websites, articles, and academic papers.
• Researcher 2: Analyze discussions across social media platforms.
• Researcher 3: Find relevant YouTube videos, including top comments and opinion trends.
• Researcher 4: Synthesize all sources, compare perspectives, provide balanced conclusions, and predict future trends.
This approach helps me get a much more well-rounded view instead of just a basic summary.
2. Programming prompt
Whenever I want OpenClaw to generate production-level code, I try to be as specific as possible:
Imagine you are a senior full-stack developer with 10+ years of experience. Build a complete feature for automatic object removal in an image editing application.
Output requirements:
- Project structure
- Main code (fully implemented with comments)
- Requirements.txt or package.json
- Instructions to run locally + sample test cases
- Explanation of logic + possible future improvements
After finishing, validate syntax and suggest basic unit tests.
With this format, I usually get something much closer to real-world, usable code.
3. Daily automation prompt
For productivity, I like turning OpenClaw into a personal assistant with recurring tasks:
Every day at 6:45 AM, automatically perform the following:
• Check my Google Calendar for today and tomorrow
• Summarize unread emails in Gmail (from the previous day until before 6:45 AM)
• Report today’s weather and air quality in New York
• Summarize 3 latest tech/AI news stories
• Remind me to drink water every 2 hours
This kind of prompt is especially useful if you’re trying to streamline your daily routine.
4. Data collection & analysis prompt
When working with data, I tend to combine collection, analysis, and visualization in one go:
Collect gold price data for March 2026 from at least three reliable sources and save it as CSV/JSON.
Then:
• Compare changes with the previous day and the day before
• Predict the trend (up/down) for the next 7 days
• Generate a simple chart to visualize daily price movements
This saves me a lot of time switching between tools.
VI. Final thoughts
After exploring OpenClaw in depth, I can say it feels like a genuinely powerful and modern AI system. The ability to work with local data opens up a lot of possibilities, but it also means I need to be more careful about how I use it.
In my experience, the key is to understand what the tool can do, set clear boundaries, and always double-check anything important. Used properly, it can significantly boost productivity; used carelessly, it can create unnecessary risks.
If you’re planning to dive deeper, it’s worth taking the time to experiment and learn how to write better prompts. That alone can completely change the quality of results you get.
")


